
HTMLDOC 1.8.23 Software Users Manual
ESP-003-20021023
Easy Software Products
Copyright 1997-2002, See the GNU General Public License for Details.
HTMLDOC supports most HTML 3.2 elements, some HTML 4.0 elements, and can generate title and table of contents pages. It does not currently support stylesheets.
HTMLDOC can be used as a standalone application, in a batch document processing environment, or as a web-based report generation application.
No restrictions are placed upon the output produced by HTMLDOC .
sgi that generated "compiled" Standard Generalized Markup
Language ("SGML") files that could be used by the Electronic Book Technologies
("EBT") documentation products (EBT is now owned by INSO.) When sgi stopped supporting
these tools we turned to INSO, but the cost of their tools is prohibitive to
small businesses.
In the end we decided to write our own program to generate our documentation. HTML seemed to be the source format of choice since WYSIWYG HTML editors are widely (and freely) available and at worst you can use a plain text editor. We needed HTML output for documentation on our web server, PDF for customers to read and/or print from their computers, and PostScript for our own printing needs.
The result of our efforts is the HTMLDOC software which is available for UNIX® and Microsoft® Windows®. Among other things, this software users manual is produced using HTMLDOC.
This manual is organized into tutorial and reference chapters:
The Graphics Interchange Format is the copyright and GIFSM is the service mark property of CompuServe Incorporated.
Compaq, Digital, and Tru64 are registered trademarks of Compaq.
Intel is a registered trademark of Intel Corporation.
IRIX and sgi are registered trademarks of Silicon Graphics,
Inc.
Linux is a registered trademark of Linus Torvalds.
MacOS is a registered trademark of Apple Computer, Inc.
Microsoft, Windows, Windows 95, Windows 98, Windows Me, Windows 2000, Windows NT, and Windows XP are registered trademarks of Microsoft Corporation.
Red Hat and RPM are registered trademarks of Red Hat, Inc.
Solaris is a registered trademark of Sun Microsystems, Inc.
SPARC is a registered trademark of SPARC International, Inc.
UNIX is a registered trademark of the X/Open Company, Ltd.
HTMLDOC is copyright 1997-2002 by Easy Software Products. This program is free software; you can redistribute it and/or modify it under the terms of the GNU General Public License as published by the Free Software Foundation; either version 2 of the License, or (at your option) any later version.
This program is distributed in the hope that it will be useful, but WITHOUT ANY WARRANTY; without even the implied warranty of MERCHANTABILITY or FITNESS FOR A PARTICULAR PURPOSE. See the GNU General Public License for more details.
A copy of the GNU General Public License is included in Appendix A of this manual. If this appendix is missing from your copy of HTMLDOC, write to the Free Software Foundation, Inc., 59 Temple Place - Suite 330, Boston, MA 02111-1307, USA.
This software is based in part on the work of the Independent JPEG Group and FLTK project.
HTMLDOC may compile and run on other platforms, however we have not tested nor do we provide support for platforms other than those listed previously.
% dselect install htmldoc-version-linux-2.0-intel.deb ENTER
% dselect remove htmldoc ENTER
% rpm -i htmldoc-version-linux-2.0-intel.rpm ENTER
% rpm -e htmldoc ENTER
% gunzip htmldoc-version-platform.tar.gz ENTER
% tar xf htmldoc-version-platform.tar ENTER
% ./setup ENTER
Substitute the correct version and platform strings as appropriate.
% /etc/software/htmldoc.remove ENTER
Double-click on the HTMLDOC package in the finder and follow the installer prompts.
Secure (https) URL support can be enabled via the OpenSSL library. You should use at least version 0.9.6.
CC
environment variable to the name and path of your ANSI C compiler:
% setenv CC /path/to/compiler ENTER         [C Shell]
% CC=/path/to/compiler; export CC ENTER     [Bourne/Korn Shell]
Similarly, if your C++ compiler is not called CC, gcc , c++, or g++, set the
CXX
environment variable to the name and path of your C++ compiler:
% setenv CXX /path/to/compiler ENTER        [C Shell]
% CXX=/path/to/compiler; export CXX ENTER   [Bourne/Korn Shell]
Then run the following command to configure HTMLDOC for installation in the default directories:
% ./configure ENTER
The default configuration will install HTMLDOC in the
/usr/bin directory with the data files under /usr/share/htmldoc
and the documentation and on-line help under /usr/share/doc/htmldoc.
Use the --prefix option to change the installation prefix to
/usr/local:
% ./configure --prefix=/usr/local ENTER
If the FLTK library is not installed in a standard location for your
compilers, use the --with-fltk-includes and
--with-fltk-libs options to point to the FLTK library:
% ./configure --with-fltk-libs=/path/to/fltk/lib \
        --with-fltk-includes=/path/to/fltk ENTER
Finally, if the OpenSSL library is not installed in a standard location for
your compilers, use the --with-openssl-includes and
--with-openssl-libs options to point to the OpenSSL library:
% ./configure --with-openssl-libs=/path/to/openssl/lib \
        --with-openssl-includes=/path/to/openssl ENTER
% make ENTERIf you get any fatal errors, please subscribe to the HTMLDOC mailing list and send a copy of the make/compiler output to "mailto:htmldoc@easysw.com" for assistance. Please note the version of HTMLDOC that you are using as well as any pertinent system information (operating system, OS version, compiler, etc.)
To subscribe to the HTMLDOC mailing list, send a message to "majordomo@easysw.com" with the text:
subscribe htmldocin the message body. You must subscribe to the list to post questions and comments.
% make install ENTER
If you are installing in a restricted directory like /usr then you'll need to be logged in as root.
To install HTMLDOC without InstallShield, create an installation directory and copy the htmldoc.exe executable, the afm directory, the data directory, and the doc directory to it.
Then use the regedit program to create the following two string entries:
HKEY_LOCAL_MACHINE\Software\Easy Software
  Products\HTMLDOC\data
HKEY_LOCAL_MACHINE\Software\Easy Software
  Products\HTMLDOC\doc
This chapter describes how to start HTMLDOC and convert HTML files into PostScript and PDF files.
| Note:
HTMLDOC currently does not support HTML 4.0 features such as
stylesheets or the |
To start HTMLDOC under UNIX type:
% htmldoc ENTER
Choose HTMLDOC from the Start menu to start HTMLDOC under Windows.
The HTMLDOC window (Figure 2-1) shows the list of input files that will be converted. Start by clicking on the Web Page radio button (1) to specify that you will be converting a HTML web page file.
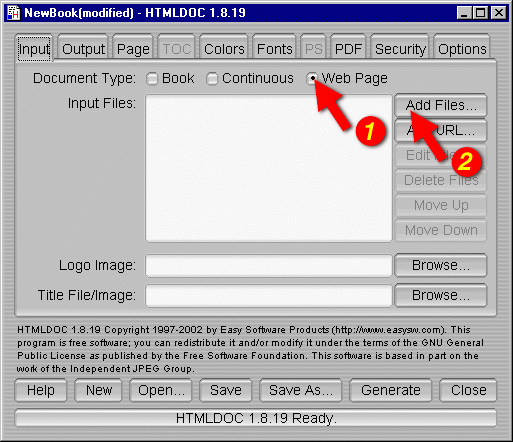
Figure 2-1 - The HTMLDOC Window
Then choose a file for conversion by clicking on the Add Files... button (2). When the file chooser dialog appears (Figure 2-2), double-click on the HTML file (3) you wish to convert from the list of files.
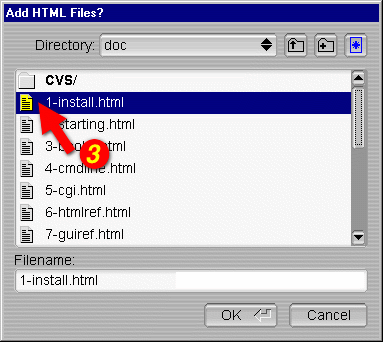
Figure 2-2 - The File Chooser Dialog
Now that you've chosen a HTML file to convert, click on the Output tab (4) to set the output file (Figure 2-3). Type the name of the output file into the Output Path field or click on the Browse... button (5) to select the output file using the file chooser.
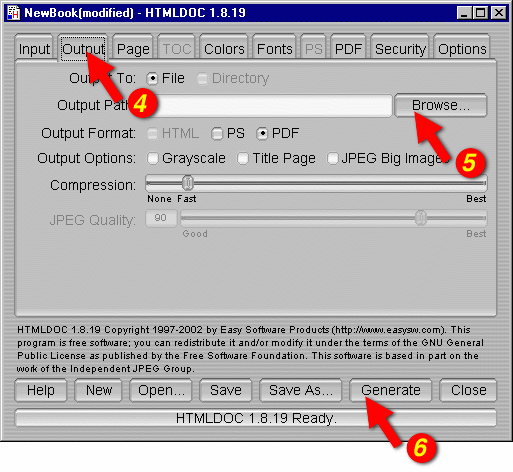
Figure 2-3 - The Output Tab
Since you chose to convert a Web Page instead of a book, HTMLDOC has automatically chosen to produce a PDF file.
HTMLDOC uses HTML heading elements to delineate chapters and headings
in a book. The H1 element is used for chapters:
<HTML>
<HEAD>
    <TITLE>The Little Computer that Could</TITLE>
</HEAD>
<BODY>
<H1>Chapter 1 - The Little Computer is Born</H1>
...
<H1>Chapter 2 - Little Computer's First Task</H1>
...
</BODY>
</HTML>
Sub-headings are marked using the H2 through H6
elements.
| Note:
When using book mode, HTMLDOC starts rendering with the first
|
Start by clicking on the Book radio button (1) to specify you'll be converting one or more HTML files into a book.
Then choose one or more files for conversion by clicking on the Add Files... button (2). When the file chooser dialog appears, pick the file(s) you wish to convert from the list of files and then click on the OK button.
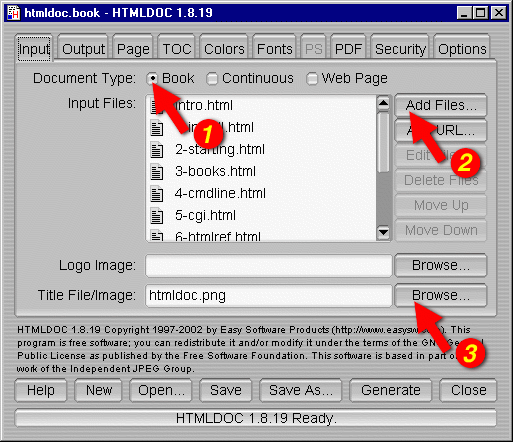
Figure 3-1: The Input Tab
HTMLDOC supports automatic generation of a title page using an image
file, the title text, and other META information on it. Type the
title image filename into the Title File field or click on the
Browse... button (3) to select a title image for your book. HTMLDOC
can also use a HTML file that you have generated for the title page(s). To use a
HTML title page, type the title filename into the Title File field or
click on the Browse... button (3) to select a HTML file for your
book.
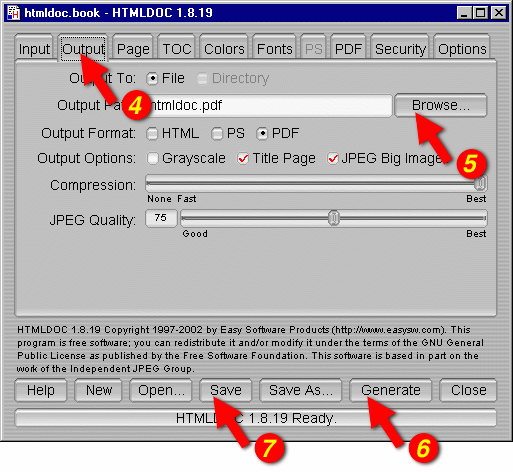
Figure 3-2: The Output Tab
The output format is set in the Output tab (4). Click on the Output tab and then click on the HTML, PS, or PDF radio buttons to set the output format.
Now that you've chosen an output format, type the name of the output file into the Output Path field or click on the Browse... button (5) to select the output file using the file chooser.
Once you have chosen the output file you can generate it by clicking on the Generate button (6) at the bottom of the HTMLDOC window.
HTMLDOC can save the list of HTML files, the title file, and all other
options to a special .BOOK file so you can regenerate your book
when you make changes to your HTML files.
Click on the Save button (7) to save the current book to a file.
This chapter describes how to use HTMLDOC from the command-line to convert web pages and generate books.
| Note:
The free version of HTMLDOC for Windows does not include the command-line program. |
To convert a single web page type:
% htmldoc --webpage -f output.pdf filename.html ENTER
% htmldoc --webpage -f output.ps filename.html ENTER
To convert more than one web page with page breaks between each HTML file, type:
% htmldoc --webpage -f output.pdf file1.html ... fileN.html ENTER
% htmldoc --webpage -f output.ps file1.html ... fileN.html ENTER
The --webpage option tells HTMLDOC that you want to
convert web pages or other unstructured HTML files. You can also use
--continuous to convert multiple HTML files without page breaks
between files and --book to convert structured HTML files with
headings into a book with a table of contents. The default document type is
--book.
The -f option tells HTMLDOC the file to generate. If you
don't specify an output file, a PDF file is sent to the standard output. The
output.pdf and output.ps arguments are the names of
the output files you want to generate. The .pdf extension specifies
that you want to generate a PDF file, while the .ps extension
specifies PostScript output.
The filename.html, file1.html, and
fileN.html arguments are the input HTML files you want to convert.
The HTML files can also be URLs, for example:
% htmldoc --webpage -f output.pdf http://slashdot.org/ ENTER
% htmldoc --webpage -f output.ps http://freshmeat.net/ http://easysw.com/ ENTER
Type one of the following commands to generate a book from one or more HTML files:
% htmldoc --book -f output.html file1.html ... fileN.html ENTER
% htmldoc --book -f output.pdf file1.html ... fileN.html ENTER
% htmldoc --book -f output.ps file1.html ... fileN.html ENTER
where output.html, output.pdf, and
output.ps are the names of the files you want to generate, and
file1.html to fileN.html are the HTML files you want
to use for the book.
The --book option tells HTMLDOC that you want to generate
a book from the HTML file(s) you specified.
The -f option tells HTMLDOC what file to generate. If you
don't specify an output file then a PDF file is sent to the standard output.
HTMLDOC will build a table of contents for the book using the heading
elements (H1, H2, etc.) in your HTML files. It will
also add a title page using the document TITLE text and other
META information you supply in your HTML files. See Chapter 6 - HTML
Reference for more information on the META variables that are
supported.
| Note:
When using book mode, HTMLDOC starts rendering with the first
|
The --titlefile option sets the HTML file or image to use on the
title page:
% htmldoc --titlefile filename.bmp ... ENTER
% htmldoc --titlefile filename.gif ... ENTER
% htmldoc --titlefile filename.jpg ... ENTER
% htmldoc --titlefile filename.png ... ENTER
% htmldoc --titlefile filename.html ... ENTER
HTMLDOC supports BMP, GIF, JPEG, and PNG images, as well as generic HTML text you supply for the title page(s).
This chapter describes how to interface HTMLDOC to your web server using CGI scripts and programs.
| Note:
The free version of HTMLDOC for Windows does not support use from a web server. |
HTMLDOC can be used in a variety of ways to generate formatted reports on a web server. The most common way is to combine HTMLDOC with a CGI script or program and send the output to the HTTP client.
To make this work the CGI script or program must send the appropriate HTTP attributes, the required empty line to signify the beginning of the document, and then execute the HTMLDOC program to generate the HTML, PostScript, or PDF file as needed.
Another way to generate PDF files from your reports is to use HTMLDOC as a "portal" application. When used as a portal, HTMLDOC automatically retrieves the named document or report from your server and passes a PDF version to the web browser. See the next sections for more information.
| WARNING:
Passing information directly from the web browser to HTMLDOC can potentially expose your system to security risks. Always be sure to "sanitize" any input from the web browser so that filenames, URLs, and options passed to HTMLDOC are not acted on by the shell program. |
Shell scripts are probably the easiest to work with, but are normally limited to GET type requests. Here is a script called topdf that acts as a portal, converting the named file to PDF:
#!/bin/sh
#
# Sample "portal" script to convert the named HTML file to PDF on-the-fly.
#
# Usage: http://www.domain.com/path/topdf/path/filename.html
#

#
# The "options" variable contains any options you want to pass to HTMLDOC.
#

options="-t pdf --webpage --header ... --footer ..."

#
# Tell the browser to expect a PDF file...
#

echo "Content-Type: application/pdf"
echo ""

#
# Run HTMLDOC to generate the PDF file...
#

htmldoc $options http://${SERVER_NAME}:${SERVER_PORT}$PATH_INFO
Users of this CGI would reference the URL "http://www.domain.com/topdf.cgi/index.html" to generate a PDF file of the site's home page.
The options variable in the script can be set to use any supported command-line option for HTMLDOC; for a complete list see Chapter 8 - Command-Line Reference.
Perl scripts offer the ability to generate more complex reports, pull data from databases, etc. The easiest way to interface Perl scripts with HTMLDOC is to write a report to a temporary file and then execute HTMLDOC to generate the PDF file.
Here is a simple Perl subroutine that can be used to write a PDF report to the HTTP client:
sub topdf(filename);

sub topdf {
    # Get the filename argument...
    my $filename = shift;

    # Make stdout unbuffered...
    select(STDOUT); $| = 1;

    # Write the content type to the client...
    print "Content-Type: application/pdf\n\n";

    # Run HTMLDOC to provide the PDF file to the user...
    system "htmldoc -t pdf --quiet --webpage $filename";
}
PHP is quickly becoming the most popular server-side scripting language
available. PHP provides a passthru() function that can be used to
run HTMLDOC. This combined with the header() function can be
used to provide on-the-fly reports in PDF format.
Here is a simple PHP function that can be used to convert a HTML report to PDF and send it to the HTTP client:
function topdf($filename, $options = "") {
    # Write the content type to the client...
    header("Content-Type: application/pdf");
    flush();

    # Run HTMLDOC to provide the PDF file to the user...
    passthru("htmldoc -t pdf --quiet --jpeg --webpage $options '$filename'");
}
The function accepts a filename and an optional "options" string for specifying the header, footer, fonts, etc.
To prevent malicious users from passing in unauthorized characters into this function, the following function can be used to verify that the URL/filename does not contain any characters that might be interpreted by the shell:
function bad_url($url) {
    // See if the URL starts with http: or https:...
    if (strncmp($url, "http://", 7) != 0 &&
	strncmp($url, "https://", 8) != 0) {
        return 1;
    }

    // Check for bad characters in the URL...
    $len = strlen($url);
    for ($i = 0; $i < $len; $i ++) {
        if (!strchr("~_*()/:%?+-&@;=,$.", $url[$i]) &&
	    !ctype_alnum($url[$i])) {
	    return 1;
	}
    }

    return 0;
}
Another method is to use the escapeshellarg() function provided
with PHP 4.0.3 and higher to generate a quoted shell argument for
HTMLDOC.
To make a "portal" script, add the following code to complete the example:
global $SERVER_NAME;
global $SERVER_PORT;
global $PATH_INFO;
global $QUERY_STRING;

if ($QUERY_STRING != "") {
    $url = "http://${SERVER_NAME}:${SERVER_PORT}${PATH_INFO}?${QUERY_STRING}";
} else {
    $url = "http://${SERVER_NAME}:${SERVER_PORT}$PATH_INFO";
}

if (bad_url($url)) {
  print("<HTML><HEAD><TITLE>Bad URL</TITLE></HEAD>\n"
       ."<BODY><H1>Bad URL</H1>\n",
       ."<P>The URL <B><TT>$url</TT></B> is bad.</P>\n"
       ."</BODY></HTML>\n");
} else {
  topdf($url);
}
C programs offer the best flexibility and easily supports on-the-fly report generation without the need for temporary files.
Here are some simple C functions that can be used to generate a PDF report to the HTTP client from a temporary file or pipe:
#include <stdio.h>
#include <stdlib.h>


/* topdf() - convert a HTML file to PDF */
FILE *topdf(const char *filename)	/* HTML file to convert */
{
  char	command[1024];			/* Command to execute */


  puts("Content-Type: application/pdf\n");

  sprintf(command, "htmldoc -t pdf --webpage %s", filename);

  return (popen(command, "w"));
}


/* topdf2() - pipe HTML output to HTMLDOC for conversion to PDF */
FILE *topdf2(void)
{
  puts("Content-Type: application/pdf\n");
  return (popen("htmldoc -t pdf --webpage -", "w"));
}
Java programs are a portable way to add PDF support to your web server. Here is a class called htmldoc that acts as a portal, converting the named file to PDF. It can also be called by your Java servlets to process an HTML file and send the result to the client in PDF format:
class htmldoc
{
  // Convert named file to PDF on stdout...
  public static int topdf(String filename)// I - Name of file to convert
  {
    String		command;	// Command string
    Process		process;	// Process for HTMLDOC
    Runtime		runtime;	// Local runtime object
    java.io.InputStream	input;		// Output from HTMLDOC
    byte		buffer [];	// Buffer for output data
    int			bytes;		// Number of bytes


    // First tell the client that we will be sending PDF...
    System.out.print("Content-type: application/pdf\n\n");

    // Construct the command string
    command = "htmldoc --quiet --jpeg --webpage -t pdf --left 36 " +
              "--header .t. --footer .1. " + filename;

    // Run the process and wait for it to complete...
    runtime = Runtime.getRuntime();

    try
    {
      // Create a new HTMLDOC process...
      process = runtime.exec(command);

      // Get stdout from the process and a buffer for the data...
      input  = process.getInputStream();
      buffer = new byte[8192];

      // Read output from HTMLDOC until we have it all...
      while ((bytes = input.read(buffer)) > 0)
        System.out.write(buffer, 0, bytes);

      // Return the exit status from HTMLDOC...
      return (process.waitFor());
    }
    catch (Exception e)
    {
      // An error occurred - send it to stderr for the web server...
      System.err.print(e.toString() + " caught while running:\n\n");
      System.err.print("    " + command + "\n");
      return (1);
    }
  }

  // Main entry for htmldoc class
  public static void main(String[] args)// I - Command-line args
  {
    String	server_name,		// SERVER_NAME env var
		server_port,		// SERVER_PORT env var
		path_info,		// PATH_INFO env var
		query_string,		// QUERY_STRING env var
		filename;		// File to convert


    if ((server_name = System.getProperty("SERVER_NAME")) != null &&
        (server_port = System.getProperty("SERVER_PORT")) != null &&
	(path_info = System.getProperty("PATH_INFO")) != null)
    {
      // Construct a URL for the resource specified...
      filename = "http://" + server_name + ":" + server_port + path_info;

      if ((query_string = System.getProperty("QUERY_STRING")) != null)
      {
        filename = filename + "?" + query_string;
      }
    }
    else if (args.length == 1)
    {
      // Pull the filename from the command-line...
      filename = args[0];
    }
    else
    {
      // Error - no args or env variables!
      System.err.print("Usage: htmldoc.class filename\n");
      return;
    }

    // Convert the file to PDF and send to the web client...
    topdf(filename);
  }
}
There are two types of HTML files - structured documents using headings (H1, H2, etc.) which HTMLDOC calls "books", and unstructured documents that do not use headings which HTMLDOC calls "web pages".
A very common mistake is to try converting a web page using:
htmldoc -f filename.pdf filename.html
which will likely produce a PDF file with no pages. To convert web page files
you must use the --webpage option at the command-line or
choose Web Page in the input tab of the GUI.
HTMLDOC does not support HTML 4.0 elements, attributes, stylesheets, or scripting.
The following HTML elements are recognized by HTMLDOC:
| Element | Version | Supported? | Notes |
|---|---|---|---|
| !DOCTYPE | 3.0 | Yes | DTD is ignored |
| A | 1.0 | Yes | See Below |
| ACRONYM | 2.0 | Yes | No font change |
| ADDRESS | 2.0 | Yes | |
| AREA | 2.0 | No | |
| B | 1.0 | Yes | |
| BASE | 2.0 | No | |
| BASEFONT | 1.0 | No | |
| BIG | 2.0 | Yes | |
| BLINK | 2.0 | No | |
| BLOCKQUOTE | 2.0 | Yes | |
| BODY | 1.0 | Yes | |
| BR | 2.0 | Yes | |
| CAPTION | 2.0 | Yes | See Below |
| CENTER | 2.0 | Yes | |
| CITE | 2.0 | Yes | Italic/Oblique |
| CODE | 2.0 | Yes | Courier |
| DD | 2.0 | Yes | |
| DEL | 2.0 | Yes | Strikethrough |
| DFN | 2.0 | Yes | Helvetica |
| DIR | 2.0 | Yes | |
| DIV | 3.2 | Yes | |
| DL | 2.0 | Yes | |
| DT | 2.0 | Yes | Italic/Oblique |
| EM | 2.0 | Yes | Italic/Oblique |
| EMBED | 2.0 | Yes | HTML Only |
| FONT | 2.0 | Yes | See Below |
| Element | Version | Supported? | Notes |
| FORM | 2.0 | No | |
| FRAME | 3.2 | No | |
| FRAMESET | 3.2 | No | |
| H1 | 1.0 | Yes | Boldface, See Below |
| H2 | 1.0 | Yes | Boldface, See Below |
| H3 | 1.0 | Yes | Boldface, See Below |
| H4 | 1.0 | Yes | Boldface, See Below |
| H5 | 1.0 | Yes | Boldface, See Below |
| H6 | 1.0 | Yes | Boldface, See Below |
| HEAD | 1.0 | Yes | |
| HR | 1.0 | Yes | See Below |
| HTML | 1.0 | Yes | |
| I | 1.0 | Yes | |
| IMG | 1.0 | Yes | See Below |
| INPUT | 2.0 | No | |
| INS | 2.0 | Yes | Underline |
| ISINDEX | 2.0 | No | |
| KBD | 2.0 | Yes | Courier Bold |
| LI | 2.0 | Yes | |
| LINK | 2.0 | No | |
| MAP | 2.0 | No | |
| MENU | 2.0 | Yes | |
| META | 2.0 | Yes | See Below |
| MULTICOL | N3.0 | No | |
| NOBR | 1.0 | No | |
| NOFRAMES | 3.2 | No | |
| OL | 2.0 | Yes | |
| OPTION | 2.0 | No | |
| P | 1.0 | Yes | |
| PRE | 1.0 | Yes | |
| Element | Version | Supported? | Notes |
| S | 2.0 | Yes | Strikethrough |
| SAMP | 2.0 | Yes | Courier |
| SCRIPT | 2.0 | No | |
| SELECT | 2.0 | No | |
| SMALL | 2.0 | Yes | |
| SPACER | N3.0 | Yes | |
| STRIKE | 2.0 | Yes | |
| STRONG | 2.0 | Yes | Boldface Italic/Oblique |
| SUB | 2.0 | Yes | Reduced Fontsize |
| SUP | 2.0 | Yes | Reduced Fontsize |
| TABLE | 2.0 | Yes | See Below |
| TD | 2.0 | Yes | |
| TEXTAREA | 2.0 | No | |
| TH | 2.0 | Yes | Boldface Center |
| TITLE | 2.0 | Yes | |
| TR | 2.0 | Yes | |
| TT | 2.0 | Yes | Courier |
| U | 1.0 | Yes | |
| UL | 2.0 | Yes | |
| VAR | 2.0 | Yes | Helvetica Oblique |
| WBR | 1.0 | No |
HTMLDOC supports many special HTML comments to initiate page breaks, set the header and footer text, and control the current media options:
<!-- FOOTER LEFT "foo" -->
<!-- FOOTER CENTER "foo" -->
<!-- FOOTER RIGHT "foo" -->
<!-- HALF PAGE -->
<!-- HEADER LEFT "foo" -->
<!-- HEADER CENTER "foo" -->
<!-- HEADER RIGHT "foo" -->
<!-- MEDIA BOTTOM nnn -->
<!-- MEDIA COLOR "foo" -->
<!-- MEDIA DUPLEX NO -->
<!-- MEDIA DUPLEX YES -->
<!-- MEDIA LANDSCAPE NO -->
<!-- MEDIA LANDSCAPE YES -->
<!-- MEDIA LEFT nnn -->
<!-- MEDIA POSITION nnn -->
<!-- MEDIA RIGHT nnn -->
<!-- MEDIA SIZE foo -->
<!-- MEDIA TOP nnn -->
<!-- MEDIA TYPE "foo" -->
<!-- NEED length -->
length units left on the current
page. The length value defaults to lines of text but can be
suffixed by in, mm, or cm to convert
from the corresponding units.
<!-- NEW PAGE -->
<!-- NEW SHEET -->
<!-- NUMBER-UP nn -->
<!-- PAGE BREAK -->
The HEADER and FOOTER comments allow you to set an
arbitrary string of text for the left, center, and right headers and footers.
Each string consists of plain text; special values or strings can be inserted
using the dollar sign ($):
$$
CHAPTER
$CHAPTERPAGE
$CHAPTERPAGE(format)
$CHAPTERPAGES
$CHAPTERPAGES(format)
$DATE
$HEADING
$LOGOIMAGE
$PAGE
$PAGE(format)
$PAGES
$PAGES(format)
$TIME
$TITLE
Limited typeface specification is currently supported to ensure portability across platforms and for older PostScript printers:
| Requested Font | Actual Font |
|---|---|
| Arial | Helvetica |
| Courier | Courier |
| Helvetica | Helvetica |
| Monospace | Courier |
| Sans-Serif | Helvetica |
| Serif | Times |
| Symbol | Symbol |
| Times | Times |
All other unrecognized typefaces are silently ignored.
Currently HTMLDOC supports a maximum of 1000 chapters (H1 headings).
This limit can be increased by changing the MAX_CHAPTERS constant
in the config.h file included with the source code.
All chapters start with a top-level heading (H1) markup. Any headings within a chapter must be of a lower level (H2 to H15). Each chapter starts a new page or the next odd-numbered page if duplexing is selected.
| Note:
Heading levels 7 to 15 are not standard HTML and will not likely be recognized by most web browsers. |
The headings you use within a chapter must start at level 2 (H2). If you skip levels the heading will be shown under the last level that was known. For example, if you use the following hierarchy of headings:
<H1>Chapter Heading</H1>
...
<H2>Section Heading 1</H2>
...
<H2>Section Heading 2</H2>
...
<H3>Sub-Section Heading 1</H3>
...
<H4>Sub-Sub-Section Heading 1</H4>
...
<H4>Sub-Sub-Section Heading 2</H4>
...
<H3>Sub-Section Heading 2</H3>
...
<H2>Section Heading 3</H2>
...
<H4>Sub-Sub-Section Heading 3</H4>
...
the table-of-contents that is generated will show:
VALUE="#"
TYPE="1"
TYPE="a"
TYPE="A"
TYPE="i"
TYPE="I"
External URL and internal (#target and
filename.html) links are fully supported for HTML and PDF
output.
When generating PDF files, local PDF file links will be converted to external file links for the PDF viewer instead of URL links. That is, you can directly link to another local PDF file from your HTML document with:
<A HREF="filename.pdf">...</A>
HTMLDOC supports the following META attributes for the
title page and document information:
<META NAME="AUTHOR" CONTENT="..."
<META NAME="COPYRIGHT" CONTENT="..."
<META NAME="DOCNUMBER" CONTENT="..."
<META NAME="GENERATOR" CONTENT="..."
<META NAME="KEYWORDS" CONTENT="..."
<META NAME="SUBJECT" CONTENT="..."
BREAK attribute is
still supported by the HR element:
<HR BREAK>Support for the
BREAK attribute is deprecated and will
be removed in a future release of HTMLDOC.
MAX_COLUMNS constant in the config.h file included with
the source code. HTMLDOC supports HTML 3.0 tables with the following
exceptions:
CAPTION element is always shown at the top of the table.
HTMLDOC does not support HTML 4.0 table elements or attributes,
such as TBODY, THEAD, TFOOT , or
RULES.
.BOOK files. The buttons on the bottom of the
HTMLDOC window allow you to manage these files and generate formatted
documents.
Note: Saving a document is not the same as generating a document. The book files saved to disk by the Save and Save As... buttons are not the final HTML, PDF, or PostScript output files. You generate those files by clicking on the Generate button.
Note: Saving a document is not the same as generating a document. The book files saved to disk by the Save and Save As... buttons are not the final HTML, PDF, or PostScript output files. You generate those files by clicking on the Generate button.
Note: Generating a document is not the same as saving a document. To save the current HTML files and settings in the HTMLDOC GUI, click on the Save or Save As... buttons instead.
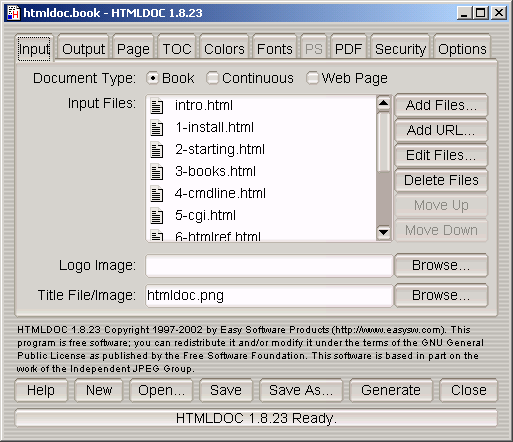
Figure 7-1 - The Input Tab
The Delete Files button only removes the files from the Input Files list. The files are not removed from disk.
Click on the Browse... button to select a logo image file using the file chooser dialog.
Click on the Browse... button to select a title file using the file chooser dialog.
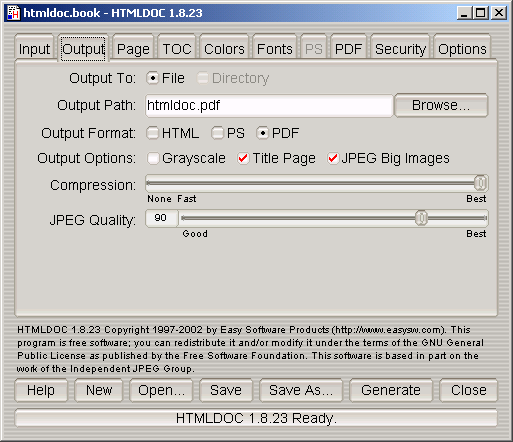
Figure 7-2 - The Output Tab
Directory output is not available when generating PDF files.
Note: HTMLDOC uses Flate compression, which is not encumbered by patents and is also used by the popular PKZIP and gzip programs. Flate is a lossless compression algorithm (that is, you get back exactly what you put in) that performs very well on indexed images and text.
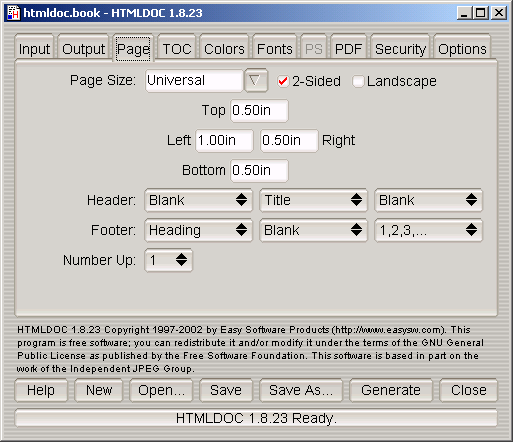
Figure 7-3 - The Page Tab
HTMLDOC supports the following standard page size names:
Click in the Page Size field and enter the page width and length separated by the letter "x" to select a custom page size. Append the letters "in" for inches, "mm" for millimeters, or "cm" for centimeters.
Select the desired text in each of the option buttons to customize the header and footer for the document/body pages. The left-most option buttons set the text that is left-justified, while the middle buttons set the text that is centered and the right buttons set the text that is right-justified. Each choice corresponds to the following text:
| Choice | Description |
|---|---|
| Blank | The field should be blank. |
| Title | The field should contain the document title. |
| Chapter Title | The field should contain the current chapter title. |
| Heading | The field should contain the current heading. |
| Logo | The field should contain the logo image. |
| 1,2,3,... | The field should contain the current page number in decimal format (1, 2, 3, ...) |
| i,ii,iii,... | The field should contain the current page number in lowercase roman numerals (i, ii, iii, ...) |
| I,II,III,... | The field should contain the current page number in uppercase roman numerals (I, II, III, ...) |
| a,b,c,... | The field should contain the current page number using lowercase letters. |
| A,B,C,... | The field should contain the current page number using UPPERCASE letters. |
| Chapter Page | The field should contain the current chapter page number. |
| 1/N,2/N,... | The field should contain the current and total number of pages (n/N). |
| 1/C,2/C,... | The field should contain the current and total number of pages in the chapter (n/N). |
| Date | The field should contain the current date (formatted for the current locale). |
| Time | The field should contain the current time (formatted for the current locale). |
| Date + Time | The field should contain the current date and time (formatted for the current locale). |
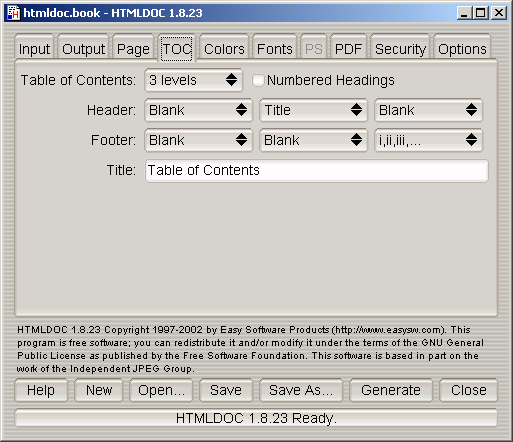
Figure 7-4 - The TOC Tab

Figure 7-5 - The Colors Tab
#RRGGBB. Click on the Lookup... button
to pick the color graphically.
#RRGGBB. Click on the Lookup... button to pick the
color graphically.
#RRGGBB. Click on the Lookup... button to pick the
color graphically.
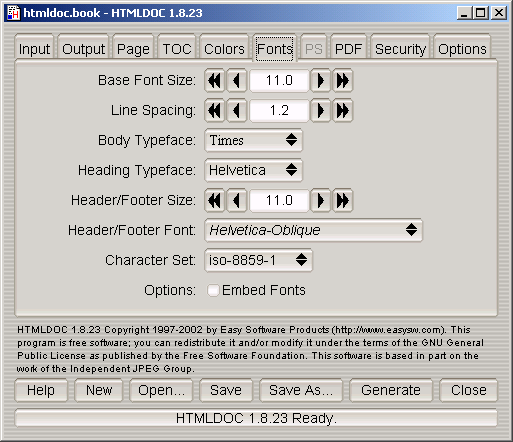
Figure 7-6 - The Fonts Tab
The Embed Fonts check box controls whether or not fonts are embedded in PostScript and PDF output.
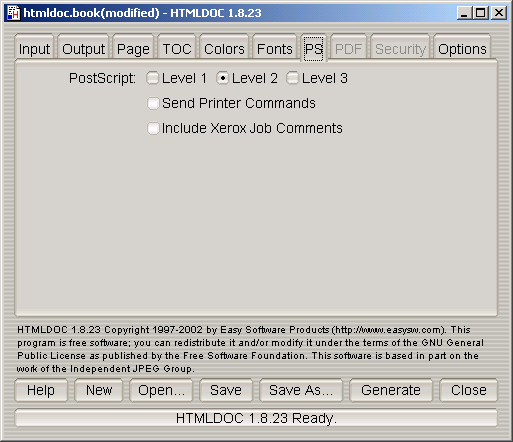
Figure 7-7 - The PS Tab
PostScript Level 2 is compatible with most PostScript printers and supports printer commands and JPEG image compression.
PostScript Level 3 is compatible with only the newest PostScript printers and supports Flate image compression in addition to the Level 2 features.
setpagedevice commands for the page size and duplex settings. Click
in the check box to enable or disable printer commands.
Printer commands are only available with Level 2 and 3 output and may not work with some printers.
The Include Xerox Job Comments check box controls whether or not the output files contain Xerox job comments. Click in the check box to enable or disable the job comments.
Job comments are available with all levels of PostScript output.
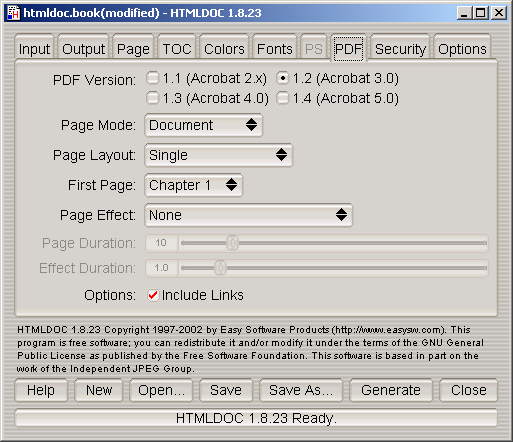
Figure 7-8 - The PDF Tab
The Document page mode displays only the document pages. The Outline page mode displays the table-of-contents outline as well as the document pages. The Full-Screen page mode displays the document pages on the whole screen; this mode is used primarily for presentations.
The Single page layout displays a single page at a time. The One Column page layout displays a single column of pages at a time. The Two Column Left and Two Column Right page layouts display two columns of pages at a time; the first page is displayed in the left or right column as selected.
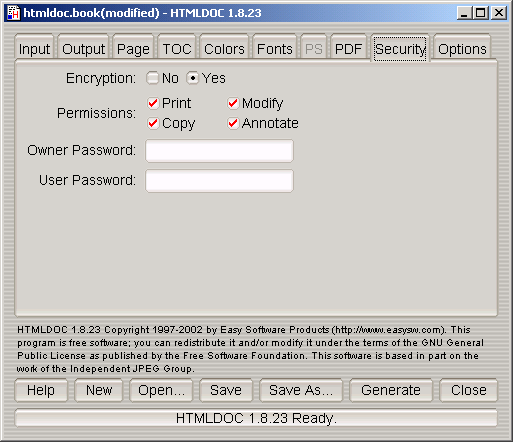
Figure 7-9 - The Security Tab
The security tab (Figure 7-9) allows you to enable PDF document encryption and security features.
The Encryption buttons control whether or not encryption is performed on the PDF file. Encrypted documents can be password protected and also provide user permissions.
The Permissions buttons control what operations are allowed by the PDF viewer.
The Owner Password field contains the document owner password, a string that is used by Adobe Acrobat to control who can change document permissions, etc.
If this field is left blank, a random 32-character password is generated so that no one can change the document using the Adobe tools.
The Include Links option controls whether or not the internal links in a document are included in the PDF output. The document outline (shown to the left of the document in Acrobat Reader) is unaffected by this setting.
The User Password field contains the document user password, a string that is used by Adobe Acrobat to restrict viewing permissions on the file.
If this field is left blank, any user may view the document without entering a password.
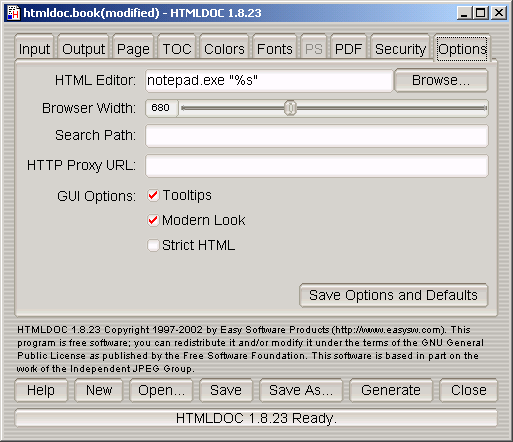
Figure 7-10 - The Options Tab
The options tab (Figure 7-10) contains the HTML file editor of your choice and allows you to save the settings and options that will be used in new documents.
The HTML Editor field contains the name of the HTML editor to run when you double-click on an input file or click on the Edit Files... button. Enter the program name in the field or click on the Browse... button to select the editor using the file chooser.
The %s is added automatically to the end of the command name to
insert the name of the file to be edited. If you are using Netscape Composer to
edit your HTML files you should put "-edit" before the %s to tell
Netscape to edit the file and not display it.
The Browser Width slider specifies the width of the browser in pixels that is used to scale images and other pixel measurements to the printable page width. You can adjust this value to more closely match the formatting on the screen.
The default browser width is 680 pixels which corresponds roughly to a 96 DPI display. The browser width is only used when generating PostScript or PDF files.
The Search Path field specifies a search path for files that are loaded by HTMLDOC. It is usually used to get images that use absolute server paths to load.
Directories are separated by the semicolon (;) so that drive letters (and eventually URLs) can be specified.
The Proxy URL field specifies a URL for a HTTP proxy server.
The Tooltips check button controls the appearance of tooltip windows over GUI controls.
The Modern Look check button controls the appearance of the GUI controls.
The Strict HTML check button controls strict HTML conformance checking. When checked, HTML elements that are improperly nested and dangling close elements will produce error messages.
The Save Options and Defaults button saves the HTML editor and all of the document settings on the other tabs for use in new documents. These settings are also used by the command-line version of HTMLDOC.
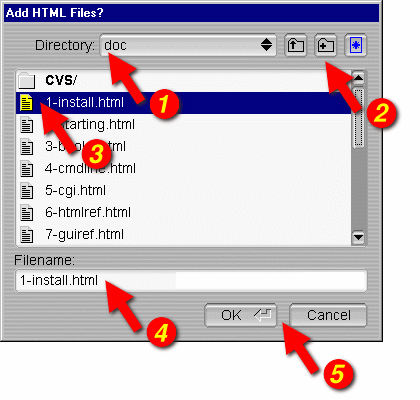
Figure 7-11 - The File Chooser
The file chooser (Figure 7-11) allows you to select one or more files and create files and directories.
The Directory option button (1) shows the current directory or folder that is displayed in the file list (3). Click on the option button to navigate to other directories or folders.
The directory buttons (2) allow you to go up one level in the directory hierarchy, create a new directory, and change the filename filter settings, respectively.
The file list (3) lists the files and directories in the current directory or folder. Double-click on a file or directory to select that file or directory. Drag the mouse or hold the CTRL key down while clicking to select multiple files.
The Filename field contains the currently selected filename. Type a name in the field to select a file or directory. As you type, any matching filenames will be highlighted; press the TAB key to accept the matches.
The dialog buttons (5) close the file chooser dialog window. Click on the OK button to accept your selections or the Cancel button to reject your selections and cancel the file operation.
This chapter describes all of the command-line options supported by HTMLDOC.
| Note:
The free version of HTMLDOC for Windows does not include the command-line program. |
% htmldoc options filename1.html ... filenameN.html ENTER
% htmldoc options filename.book ENTER
The first form converts the named HTML files to the specified output format immediately. The second form loads the specified
.book file
and displays the HTMLDOC window, allowing a user to make changes and/or
generate the document interactively.
If no output file or directory is specified, then all output is sent to the standard output file.
-d option specifies an output directory
for the document files.
This option is not compatible with the PDF output format.
-f option specifies an output file for the
document.
The -t option specifies the output format for the document and
can be one of the following:
| Format | Description |
|---|---|
| html | Generate one or more indexed HTML files. |
| Generate a PDF file (default version - 1.3). | |
| pdf11 | Generate a PDF 1.1 file for Acrobat Reader 2.0. |
| pdf12 | Generate a PDF 1.2 file for Acrobat Reader 3.0. |
| pdf13 | Generate a PDF 1.3 file for Acrobat Reader 4.0. |
| pdf14 | Generate a PDF 1.4 file for Acrobat Reader 5.0. |
| ps | Generate one or more PostScript files (default level). |
| ps1 | Generate one or more Level 1 PostScript files. |
| ps2 | Generate one or more Level 2 PostScript files. |
| ps3 | Generate one or more Level 3 PostScript files. |
-v option specifies that progress information should
be sent/displayed to the standard error file.
--batch option specifies a book
file that you would like to generate without the GUI popping up. This option can
be combined with other options to generate the same book in different formats
and sizes:
% htmldoc --batch filename.book -f filename.ps ENTER
% htmldoc --batch filename.book -f filename.pdf ENTER
--bodycolor option specifies the
background color for all pages in the document. The color can be specified by a
standard HTML color name or as a 6-digit hexadecimal number of the form
#RRGGBB.
The --bodyfont option specifies the default text font used for
text in the document body. The typeface parameter can be one of the
following:
| typeface | Actual Font |
|---|---|
| Arial | Helvetica |
| Courier | Courier |
| Helvetica | Helvetica |
| Monospace | Courier |
| Sans-Serif | Helvetica |
| Serif | Times |
| Symbol | Symbol |
| Times | Times |
The --bodyimage option specifies the background image for all
pages in the document. The supported formats are BMP, GIF, JPEG, and PNG.
The --book option specifies that the input files comprise a book
with chapters and headings.
The --bottom option specifies the bottom margin. The default
units are points (1 point = 1/72nd inch); the suffixes "in", "cm", and "mm"
specify inches, centimeters, and millimeters, respectively.
This option is only available when generating PostScript or PDF files.
The --browserwidth option specifies the browser width in pixels.
The browser width is used to scale images and pixel measurements when generating
PostScript and PDF files. It does not affect the font size of text.
The default browser width is 680 pixels which corresponds roughly to a 96 DPI display. Please note that your images and table sizes are equal to or smaller than the browser width, or your output will overlap or truncate in places.
The --charset option specifies the 8-bit character set encoding
to use for the entire document. HTMLDOC comes with the following
character set files:
| charset | Character Set |
|---|---|
| cp-874 | Windows code page 874 |
| cp-1250 | Windows code page 1250 |
| cp-1251 | Windows code page 1251 |
| cp-1252 | Windows code page 1252 |
| cp-1253 | Windows code page 1253 |
| cp-1254 | Windows code page 1254 |
| cp-1255 | Windows code page 1255 |
| cp-1256 | Windows code page 1256 |
| cp-1257 | Windows code page 1257 |
| cp-1258 | Windows code page 1258 |
| iso-8859-1 | ISO-8859-1 |
| iso-8859-2 | ISO-8859-2 |
| iso-8859-3 | ISO-8859-3 |
| iso-8859-4 | ISO-8859-4 |
| iso-8859-5 | ISO-8859-5 |
| iso-8859-6 | ISO-8859-6 |
| iso-8859-7 | ISO-8859-7 |
| iso-8859-8 | ISO-8859-8 |
| iso-8859-9 | ISO-8859-9 |
| iso-8859-14 | ISO-8859-14 |
| iso-8859-15 | ISO-8859-15 |
| koi8-r | KOI8-R |
--color option specifies that color output is
desired.
This option is only available when generating PostScript or PDF files.
--compression option specifies
that Flate compression should be performed on the output file(s). The optional
level parameter is a number from 1 (fastest and least amount of
compression) to 9 (slowest and most amount of compression).
This option is only available when generating Level 3 PostScript or PDF files.
--continuous option specifies that the
input files comprise a web page (or site) and that no title page or
table-of-contents should be generated. Unlike the --webpage option
described later in this chapter, page breaks are not inserted between each input
file.
This option is only available when generating PostScript or PDF files.
--datadir option specifies the
location of data files used by HTMLDOC.
--duplex option specifies that the output
should be formatted for two sided printing.
This option is only available when generating PostScript or PDF files. Use
the --pscommands option to generate PostScript duplex mode
commands.
--effectduration option
specifies the duration of a page transition effect in seconds.
This option is only available when generating PDF files.
The --embedfonts option specifies that fonts should be embedded
in PostScript and PDF output. This is especially useful when generating
documents in character sets other than ISO-8859-1.
The --encryption option enables encryption and security features
for PDF output.
This option is only available when generating PDF files.
The --firstpage option specifies the first page that will be
displayed in a PDF file. The page parameter can be one of the
following:
| page | Description |
|---|---|
| p1 | The first page of the document. |
| toc | The first page of the table-of-contents. |
| c1 | The first page of chapter 1. |
This option is only available when generating PDF files.
--fontsize option specifies the base
font size for the entire document in points (1 point = 1/72nd inch).
--fontspacing option specifies
the line spacing for the entire document as a multiplier of the base font size.
A spacing value of 1 makes each line of text the same height as the
font.
The --footer option specifies the contents of the page footer.
The lcr parameter is a three-character string representing the
left, center, and right footer fields. Each character can be one of the
following:
| lcr | Description |
|---|---|
| . | A period indicates that the field should be blank. |
| : | A colon indicates that the field should contain the current and total number of pages in the chapter (n/N). |
| / | A slash indicates that the field should contain the current and total number of pages (n/N). |
| 1 | The number 1 indicates that the field should contain the current page number in decimal format (1, 2, 3, ...) |
| a | A lowercase "a" indicates that the field should contain the current page number using lowercase letters. |
| A | An uppercase "A" indicates that the field should contain the current page number using UPPERCASE letters. |
| c | A lowercase "c" indicates that the field should contain the current chapter title. |
| C | An uppercase "C" indicates that the field should contain the current chapter page number. |
| d | A lowercase "d" indicates that the field should contain the current date. |
| D | An uppercase "D" indicates that the field should contain the current date and time. |
| h | An "h" indicates that the field should contain the current heading. |
| i | A lowercase "i" indicates that the field should contain the current page number in lowercase roman numerals (i, ii, iii, ...) |
| I | An uppercase "I" indicates that the field should contain the current page number in uppercase roman numerals (I, II, III, ...) |
| l | A lowercase "l" indicates that the field should contain the logo image. |
| t | A lowercase "t" indicates that the field should contain the document title. |
| T | An uppercase "T" indicates that the field should contain the current time. |
Setting the footer to "..." disables the footer entirely.
The --format option specifies the output format for the document
and can be one of the following:
| Format | Description |
|---|---|
| html | Generate one or more indexed HTML files. |
| Generate a PDF file (default version - 1.3). | |
| pdf11 | Generate a PDF 1.1 file for Acrobat Reader 2.0. |
| pdf12 | Generate a PDF 1.2 file for Acrobat Reader 3.0. |
| pdf13 | Generate a PDF 1.3 file for Acrobat Reader 4.0. |
| pdf14 | Generate a PDF 1.4 file for Acrobat Reader 5.0. |
| ps | Generate one or more PostScript files (default level). |
| ps1 | Generate one or more Level 1 PostScript files. |
| ps2 | Generate one or more Level 2 PostScript files. |
| ps3 | Generate one or more Level 3 PostScript files. |
--gray option specifies that grayscale output is
desired.
This option is only available when generating PostScript or PDF files.
--header option specifies the contents of
the page header. The lcr parameter is a three-character string
representing the left, center, and right header fields. See the
--footer option for the list of formatting characters.
Setting the header to "..." disables the header entirely.
--headfootfont option specifies the
font that is used for the header and footer text. The font
parameter can be one of the following:
This option is only available when generating PostScript or PDF files.
--headfootsize option sets the size
of the header and footer text in points (1 point = 1/72nd inch).
This option is only available when generating PostScript or PDF files.
The --headingfont options sets the typeface that is used for
headings in the document. The typeface parameter can be one of the
following:
| typeface | Actual Font |
|---|---|
| Arial | Helvetica |
| Courier | Courier |
| Helvetica | Helvetica |
| Monospace | Courier |
| Sans-Serif | Helvetica |
| Serif | Times |
| Symbol | Symbol |
| Times | Times |
--help option displays all of the available
options to the standard output file.
--helpdir option specifies the
location of the on-line help files.
--jpeg option enables JPEG compression
of continuous-tone images. The optional quality parameter specifies
the output quality from 0 (worst) to 100 (best).
This option is only available when generating Level 2 and Level 3 PostScript or PDF files.
--landscape option specifies that the
output should be in landscape orientation (long edge on top).
This option is only available when generating PostScript or PDF files.
--left option specifies the left margin.
The default units are points (1 point = 1/72nd inch); the suffixes "in", "cm",
and "mm" specify inches, centimeters, and millimeters, respectively.
This option is only available when generating PostScript or PDF files.
--linkcolor option specifies the
color of links in HTML and PDF output. The color can be specified by name or as
a 6-digit hexadecimal number of the form #RRGGBB.
The --links option specifies that PDF output should contain
hyperlinks.
--linkstyle option specifies the
style of links in HTML and PDF output. The style can be "plain" for no
decoration or "underline" to underline links.
--logoimage option specifies the
logo image for the HTML navigation bar and page headers and footers for
PostScript and PDF files. The supported formats are BMP, GIF, JPEG, and PNG.
--no-compression option specifies that
Flate compression should not be performed on the output files.
--no-duplex option specifies that the
output should be formatted for one sided printing.
This option is only available when generating PostScript or PDF files. Use
the --pscommands option to generate PostScript duplex mode
commands.
--no-embedfonts option specifies that
fonts should not be embedded in PostScript and PDF output.
The --no-encryption option specifies that no encryption/security
features should be enabled in PDF output.
This option is only available when generating PDF files.
--no-jpeg option specifies that JPEG
compression should not be performed on large images.
The --no-links option specifies that PDF output should not
contain hyperlinks.
--no-localfiles option disables access
to local files on the system. This option should be used when providing remote
document conversion services.
--no-numbered option specifies that
headings should not be numbered.
--no-pscommands option specifies that
PostScript device commands should not be written to the output files.
The --no-strict option turns off strict HTML conformance
checking.
--no-title option specifies that the title
page should not be generated.
--no-toc option specifies that the
table-of-contents pages should not be generated.
--no-xrxcomments option specifies that
Xerox PostScript job comments should not be written to the output files.
This option is only available when generating PostScript files.
--numbered option specifies that headings
should be numbered.
--nup option sets the number of pages that
are placed on each output page. Valid values for the pages
parameter are 1, 2, 4, 6, 9, and 16.
--outdir option specifies an output
directory for the document files.
This option is not compatible with the PDF output format.
--outfile option specifies an output
file for the document.
The --owner-password option specifies the owner password for a
PDF file. If not specified or the empty string (""), a random password is
generated.
This option is only available when generating PDF files.
--pageduration option specifies
the number of seconds that each page will be displayed in the document.
This option is only available when generating PDF files.
The --pageeffect option specifies the page effect to use in PDF
files. The effect parameter can be one of the following:
| effect | Description |
|---|---|
| none | No effect is generated. |
| bi | Box Inward |
| bo | Box Outward |
| d | Dissolve |
| gd | Glitter Down |
| gdr | Glitter Down and Right |
| gr | Glitter Right |
| hb | Horizontal Blinds |
| hsi | Horizontal Sweet Inward |
| hso | Horizontal Sweep Outward |
| vb | Vertical Blinds |
| vsi | Vertical Sweep Inward |
| vso | Vertical Sweep Outward |
| wd | Wipe Down |
| wl | Wipe Left |
| wr | Wipe Right |
| wu | Wipe Up |
This option is only available when generating PDF files.
The --pagelayout option specifies the initial page layout in the
PDF viewer. The layout parameter can be one of the following:
| layout | Description |
|---|---|
| single | A single page is displayed. |
| one | A single column is displayed. |
| twoleft | Two columns are displayed with the first page on the left. |
| tworight | Two columns are displayed with the first page on the right. |
This option is only available when generating PDF files.
The --pagemode option specifies the initial viewing mode in the
PDF viewer. The mode parameter can be one of the following:
| mode | Description |
|---|---|
| document | The document pages are displayed in a normal window. |
| outline | The document outline and pages are displayed. |
| fullscreen | The document pages are displayed on the entire screen in "slideshow" mode. |
This option is only available when generating PDF files.
The --path option specifies a search path for files that are
loaded by HTMLDOC. It is usually used to get images that use absolute server
paths to load.
Directories are separated by the semicolon (;) so that drive letters and URLs can be specified. Quotes around the directory parameter are optional. They are usually used when the directory string contains spaces.
--path "dir1;dir2;dir3;...;dirN"
The --permissions option specifies the document permissions. The
available permission parameters are listed below:
| Permission | Description |
|---|---|
| all | All permissions |
| annotate | User can annotate document |
| copy | User can copy text and images from document |
| modify | User can modify document |
| User can print document | |
| no-annotate | User cannot annotate document |
| no-copy | User cannot copy text and images from document |
| no-modify | User cannot modify document |
| no-print | User cannot print document |
| none | No permissions |
The --encryption option must be used in conjunction with the
--permissions parameter.
--permissions no-print --encryption
Multiple options can be specified with multiple --permissions
entries as needed.
--permissions no-print --permissions no-copy --encryption
This option is only available when generating PDF files.
--portrait option specifies that the output
should be in portrait orientation (short edge on top).
This option is only available when generating PostScript or PDF files.
--pscommands option specifies that
PostScript device commands should be written to the output files.
This option is only available when generating Level 2 and Level 3 PostScript files.
The --quiet option prevents error messages from being sent to
stderr.
--right option specifies the right
margin. The default units are points (1 point = 1/72nd inch); the suffixes "in",
"cm", and "mm" specify inches, centimeters, and millimeters, respectively.
This option is only available when generating PostScript or PDF files.
The --size option specifies the page size. The size
parameter can be one of the following standard sizes:
| size | Description |
|---|---|
| Letter | 8.5x11in (216x279mm) |
| A4 | 8.27x11.69in (210x297mm) |
| Universal | 8.27x11in (210x279mm) |
Custom sizes are specified by the page width and length separated by the letter "x" to select a custom page size. Append the letters "in" for inches, "mm" for millimeters, or "cm" for centimeters.
This option is only available when generating PostScript or PDF files. Use
the --pscommands option to generate PostScript page size
commands.
The --strict option turns on strict HTML conformance checking.
When enabled, HTML elements that are improperly nested and dangling close
elements will produce error messages.
--textcolor option specifies the
default text color for all pages in the document. The color can be specified by
a standard HTML color name or as a 6-digit hexadecimal number of the form
#RRGGBB.
The --textfont options sets the typeface that is used for text
in the document. The typeface parameter can be one of the
following:
| typeface | Actual Font |
|---|---|
| Arial | Helvetica |
| Courier | Courier |
| Helvetica | Helvetica |
| Monospace | Courier |
| Sans-Serif | Helvetica |
| Serif | Times |
| Symbol | Symbol |
| Times | Times |
--title option specifies that a title page
should be generated.
--titlefile option specifies a
HTML file to use for the title page.
--titleimage option specifies the
title image for the title page. The supported formats are BMP, GIF, JPEG, and
PNG.
--tocfooter option specifies the
contents of the table-of-contents footer. The lcr parameter is a
three-character string representing the left, center, and right footer fields.
See the
--footer option for the list of formatting characters.
Setting the TOC footer to "..." disables the TOC footer
entirely.
--tocheader option specifies the
contents of the table-of-contents header. The lcr parameter is a
three-character string representing the left, center, and right header fields.
See the
--footer option for the list of formatting characters.
Setting the TOC header to "..." disables the TOC header
entirely.
--toclevels options specifies the
number of heading levels to include in the table-of-contents pages. The
levels parameter is a number from 1 to 6.
--toctitle options specifies the
string to display at the top of the table-of-contents; the default string is
"Table of Contents".
--top option specifies the top margin. The
default units are points (1 point = 1/72nd inch); the suffixes "in", "cm", and
"mm" specify inches, centimeters, and millimeters, respectively.
This option is only available when generating PostScript or PDF files.
The --user-password option specifies the user password for a PDF
file. If not specified or the empty string (""), no password will be required to
view the document.
This option is only available when generating PDF files.
The --verbose option specifies that progress information should
be sent/displayed to the standard error file.
The --version option displays the HTMLDOC version number.
The --webpage option specifies that the input files comprise a
web page (or site) and that no title page or table-of-contents should be
generated. HTMLDOC will insert a page break between each input file.
This option is only available when generating PostScript or PDF files.
--xrxcomments option specifies that Xerox
PostScript job comments should be written to the output files.
This option is only available when generating PostScript files.
HTMLDOC sends error and status messages to stderr unless the
--quiet option is provided on the command-line. Applications can
capture these messages to relay errors or statistics to the user.
The BYTES: message specifies the number of bytes that were
written to an output file. If the output is directed at a directory then
multiple BYTES: messages will be sent.
The PAGES: message specifies the number of pages that were
written to an output file. If the output is directed at a directory then
multiple PAGES: messages will be sent. No PAGES:
messages are sent when generating HTML output.
The ERRnnn: messages specify an error condition. Error numbers 1
to 14 map to the following errors:
Error numbers 100 to 505 correspond directly to a HTTP status code.
HTMLDOC is provided under the GNU General Public License ("GPL") with a license exception for the OpenSSL toolkit. A copy of the exception and license follows this introduction.
For those not familiar with the GNU GPL, the license basically allows you to:
What this license does not allow you to do is make changes or add features to HTMLDOC and then sell a binary distribution without source code. You must provide source for any changes or additions to the software, and all code must be provided under the GPL.
In addition, as the copyright holder of HTMLDOC, Easy Software Products grants the following special exception:
No developer is required to provide this exception in a derived work.
Easy Software Products also sells rights to the HTMLDOC source code under a binary distribution license for vendors that are unable to release source code for their additions and modifications to HTMLDOC under the GNU GPL. For information please contact us at the address shown above.
Easy Software Products sells software support for HTMLDOC. You can find out more at our web site:
http://www.easysw.com/
Version 2, June 1991
Copyright 1989, 1991 Free Software Foundation, Inc.
59 Temple Place, Suite 330, Boston, MA 02111-1307 USA

Everyone is permitted to copy and distribute verbatim
copies of this license document, but changing it is not allowed.
The licenses for most software are designed to take away your freedom to share and change it. By contrast, the GNU General Public License is intended to guarantee your freedom to share and change free software--to make sure the software is free for all its users. This General Public License applies to most of the Free Software Foundation's software and to any other program whose authors commit to using it. (Some other Free Software Foundation software is covered by the GNU Library General Public License instead.) You can apply it to your programs, too.
When we speak of free software, we are referring to freedom, not price. Our General Public Licenses are designed to make sure that you have the freedom to distribute copies of free software (and charge for this service if you wish), that you receive source code or can get it if you want it, that you can change the software or use pieces of it in new free programs; and that you know you can do these things.
To protect your rights, we need to make restrictions that forbid anyone to deny you these rights or to ask you to surrender the rights. These restrictions translate to certain responsibilities for you if you distribute copies of the software, or if you modify it.
For example, if you distribute copies of such a program, whether gratis or for a fee, you must give the recipients all the rights that you have. You must make sure that they, too, receive or can get the source code. And you must show them these terms so they know their rights.
We protect your rights with two steps: (1) copyright the software, and (2) offer you this license which gives you legal permission to copy, distribute and/or modify the software.
Also, for each author's protection and ours, we want to make certain that everyone understands that there is no warranty for this free software. If the software is modified by someone else and passed on, we want its recipients to know that what they have is not the original, so that any problems introduced by others will not reflect on the original authors' reputations.
Finally, any free program is threatened constantly by software patents. We wish to avoid the danger that redistributors of a free program will individually obtain patent licenses, in effect making the program proprietary. To prevent this, we have made it clear that any patent must be licensed for everyone's free use or not licensed at all.
The precise terms and conditions for copying, distribution and modification follow.
Activities other than copying, distribution and modification are not covered by this License; they are outside its scope. The act of running the Program is not restricted, and the output from the Program is covered only if its contents constitute a work based on the Program (independent of having been made by running the Program). Whether that is true depends on what the Program does.
You may charge a fee for the physical act of transferring a copy, and you may at your option offer warranty protection in exchange for a fee.
These requirements apply to the modified work as a whole. If identifiable sections of that work are not derived from the Program, and can be reasonably considered independent and separate works in themselves, then this License, and its terms, do not apply to those sections when you distribute them as separate works. But when you distribute the same sections as part of a whole which is a work based on the Program, the distribution of the whole must be on the terms of this License, whose permissions for other licensees extend to the entire whole, and thus to each and every part regardless of who wrote it.
Thus, it is not the intent of this section to claim rights or contest your rights to work written entirely by you; rather, the intent is to exercise the right to control the distribution of derivative or collective works based on the Program.
In addition, mere aggregation of another work not based on the Program with the Program (or with a work based on the Program) on a volume of a storage or distribution medium does not bring the other work under the scope of this License.
The source code for a work means the preferred form of the work for making modifications to it. For an executable work, complete source code means all the source code for all modules it contains, plus any associated interface definition files, plus the scripts used to control compilation and installation of the executable. However, as a special exception, the source code distributed need not include anything that is normally distributed (in either source or binary form) with the major components (compiler, kernel, and so on) of the operating system on which the executable runs, unless that component itself accompanies the executable.
If distribution of executable or object code is made by offering access to copy from a designated place, then offering equivalent access to copy the source code from the same place counts as distribution of the source code, even though third parties are not compelled to copy the source along with the object code.
If any portion of this section is held invalid or unenforceable under any particular circumstance, the balance of the section is intended to apply and the section as a whole is intended to apply in other circumstances.
It is not the purpose of this section to induce you to infringe any patents or other property right claims or to contest validity of any such claims; this section has the sole purpose of protecting the integrity of the free software distribution system, which is implemented by public license practices. Many people have made generous contributions to the wide range of software distributed through that system in reliance on consistent application of that system; it is up to the author/donor to decide if he or she is willing to distribute software through any other system and a licensee cannot impose that choice.
This section is intended to make thoroughly clear what is believed to be a consequence of the rest of this License.
Each version is given a distinguishing version number. If the Program specifies a version number of this License which applies to it and "any later version", you have the option of following the terms and conditions either of that version or of any later version published by the Free Software Foundation. If the Program does not specify a version number of this License, you may choose any version ever published by the Free Software Foundation.
This appendix describes the HTMLDOC .book file format.
The HTMLDOC .book file format is a simple text format that
provides the command-line options and files that are part of the document. These
files can be used from the GUI interface or from the command-line using the
--batch option:
htmldoc filename.book
htmldoc --batch filename.book
The first form will load the book and display the GUI interface, if configured. Windows users should use ghtmldoc.exe executable to show the GUI and htmldoc.exe for the batch mode:
ghtmldoc.exe filename.book
htmldoc.exe --batch filename.book
Each .book file starts with a line reading:
#HTMLDOC 1.8.17
The version number (1.8.17) is optional.
Following the header is a line containing the options for the book. You can use any valid command-line option on this line:
-f htmldoc.pdf --titleimage htmldoc.png --duplex --compression=9 --jpeg=90
Long option lines can be broken using a trailing backslash (\ ) on the end of each continuation line:
-f htmldoc.pdf --titleimage htmldoc.png --duplex \
--compression=9 --jpeg=90
Following the options are a list of files or URLs to include in the document:
intro.html
1-install.html
2-starting.html
3-books.html
4-cmdline.html
5-cgi.html
6-htmlref.html
7-guiref.html
8-cmdref.html
a-license.html
b-book.html
c-relnotes.html
The following is the complete book file needed to generate this documentation:
#HTMLDOC 1.8.13
-f htmldoc.pdf --titleimage htmldoc.png --duplex --compression=9 --jpeg=90
intro.html
1-install.html
2-starting.html
3-books.html
4-cmdline.html
5-cgi.html
6-htmlref.html
7-guiref.html
8-cmdref.html
a-license.html
b-book.html
c-relnotes.html
Prior to HTMLDOC version 1.8.12, the book file format was slightly different:
#HTMLDOC version
file count
file(s)
options
While HTMLDOC still supports reading this format, we do not recommend
using it for new books. In particular, when generating a document using the
--batch option, some options may not be applied correctly since the
files are loaded prior to setting the output options in the old
format.
This appendix provides the release notes for each version of HTMLDOC.